Mon – Fri: 7:00 am – 5:00 pm
Sat: 8:00 am – 12:00 pm
Good luck with your installation, should you have any enquiries about these steps, or to arrange a supply and fit service – feel free to give us a call on 01621842000 or WhatsApp a message on +447949280147 we would love to hear from you.
System Specifications: Guttering:
As well as normal levels of rainfall, a domestic or light commercial eaves gutter system must be able to cope with an intense rainfall event, lasting at least two minutes, that could happen once a year anywhere in the UK. The British Standard BS12056 shows how to work out the amount of rainwater (in litres per second) that could run off a roof.
Rainwater run-off = rainfall intensity (litres per second per m²) X the effective roof area (m²)
Example:
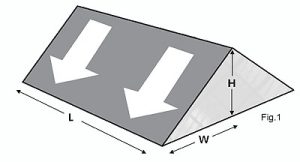
A roof has dimensions L = 2m, H = 3m and W = 4m.
See Table Below: to verify that at this flow rate the Half Round gutter would easily cope with the volume of water.
We stock Kayflow systems as our preferred supplier and different gutter styles have different flow rates and capabilities. The following flow rates are for installations with an end outlet and laid level gutter (up to 3mm fall per metre).
The roof area to be drained should always be compared with the maximum area that a gutter type is able to drain. If the figure is too low the options are to select a system with a higher capacity or increase the fall on the gutter. A third option is to move the outlet point to a central position to effectively double the gutter drainage capacity.
| Type | Height | Width | Flow Rate | Area |
|---|---|---|---|---|
| Round* | 50mm | 114mm | 0.9 l/s | 43m² |
| Square | 57mm | 117mm | 1.6 l/s | 76m² |
| Deep* | 70mm | 114mm | 1.8 l/s | 86m² |
| Ogee* | 70/80mm | 120mm | 2.2 l/s | 105m² |
| SuperDeep 170 | 108mm | 170mm | 4.3 l/s | 205m² |
All flow rates are for end outlet with the gutter laid level and have been independently established through physical testing to BS12056-3:2000.
*Standard and Cast Effect versions have the same performance characteristics.
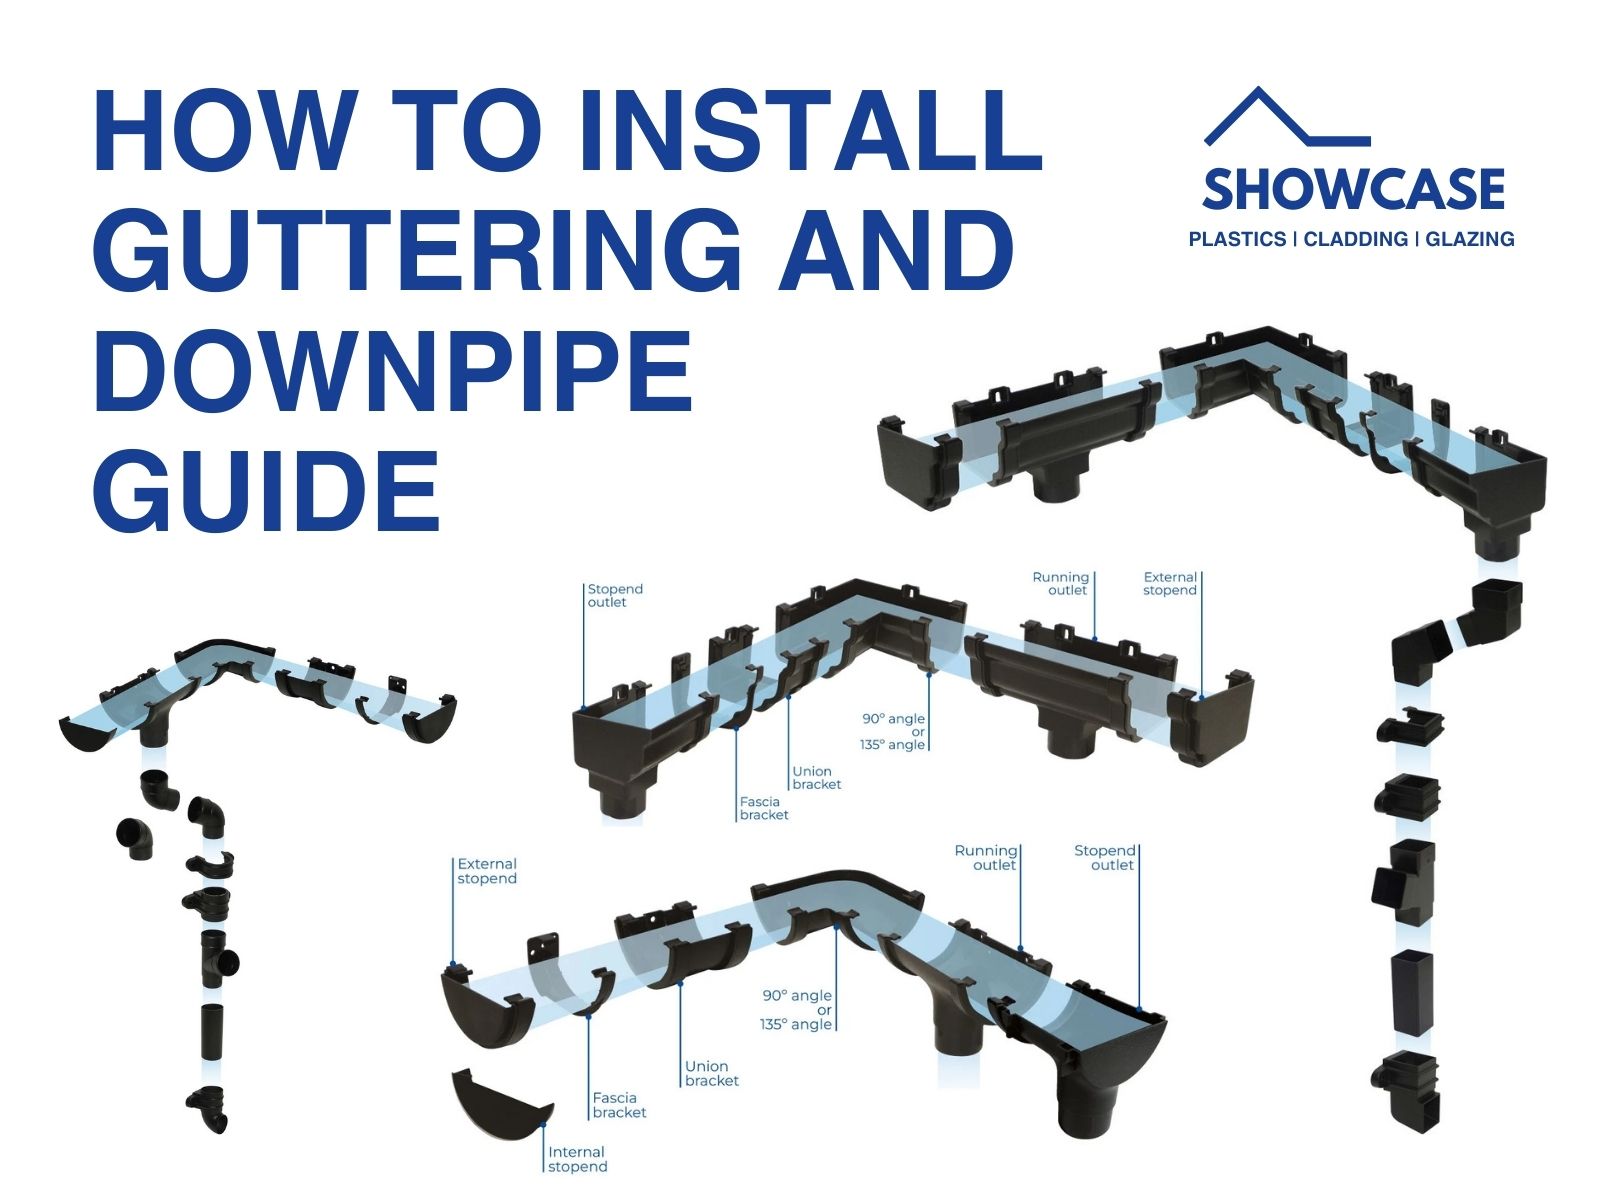
Guide to Installation – Rainwater Systems:
Pipes:
Before commencing the installation ensure that all fascias are in good order and ready to accept the new rainwater system. Your plan will be dictated by the position of your drains. Your downpipes must be positioned directly over existing drains so mark them on your sketch.
To calculate the length of downpipe required at each drain point you need to measure from the ground to the eaves. If you have exposed brickwork you can count the number of brick courses and divide the answer by 13 to get the length of downpipe you need in metres. Remember downpipe is available in 2.5m, 4m and 5.5 metre lengths.
To calculate the length of gutter required simply measure around the building at ground level. Round it up to the nearest metre and divide it by 4 and that will tell you how many lengths of gutter you will need (as each length measures 4m).
Fascia Brackets:
Fascia brackets should be used to attach the gutter at no more than 1m intervals. So if you have 40 metres of gutter you will need an absolute minimum of 40 fascia brackets. Bracket spacing is a maximum of 1 mtr for Square and Half Round & 800mm for Deep and Ogee systems.
Fascia brackets should be used within no more than 150mm of stop end outlets, running outlets, angles, union brackets and stop ends. Use one either side of the fitting. Mark on your sketch where you will need angles to navigate the gutter round the corners.
Outlets & Unions:
On a straight run gutter lengths need to be linked with a union bracket. Union brackets need to be screwed to the fascia and a fascia bracket is to be fitted no less than 150mm either side. At the points where the gutter and downpipe meet you will need an outlet. If this happens to be at the end of a gutter length you will need to use a stop end outlet; if it is in the middle you need a running outlet. Again, use a bracket less than 150mm either side and fix the outlet to the fascia using the screw holes provided.
If you do not require an outlet at the end of a gutter run you will need to use an external stop end. Downpipe lengths are connected by pipe sockets and the downpipe should be connected to the wall with pipe clips at 1m intervals.
Offset bends can be used to angle the downpipe around eaves and other obstructions or to angle the downpipe towards a drain. They fit straight into the downpipe. If you want two separate outlets to link into one downpipe you will need to use a branch or hopper.
Setting Up:
Start by fitting the outlet directly above the drains (running outlet if it is in the middle and stop end outlet if it is at the end). Use a plumbline to check it lines up. Fix the outlet to the fascia with the 25mm No 10 rustproof screws. Bear in mind that the gutter connecting to the outlet will need to be 7mm higher at the far end (per 4m length).
Next fit the bracket fascia furthest away from the outlet ensuring you allow for the fall of 7mm every 4m length of gutter. For Example, if it’s 8m away the bracket should be approx 14mm higher than the outlet (you don’t have to be exact but tie a string line to the outlet and pull across then measure upwards).
Now tie the other end of the string line to the far bracket and attach fascia brackets at the appropriate intervals gradually sloping down toward the outlet. Repeat this process from the other side if it is a running outlet.
Brackets & Joints:
Tie the other end of the string line to the far bracket and attach fascia brackets at the appropriate intervals gradually sloping down toward the outlet. Repeat this process from the other side if it is a running outlet. Fascia brackets are to be fitted at a minimum spacing of 800mm for Ogee and Deep & 1 Mtr for ½ Round and Square. Conservatory roofs will require brackets at a minimum of 500mm to allow for snow loads. Use a union bracket if you need to join two lengths of gutter together. Simply clip the two lengths of gutter into the union bracket and screw it to the fascia. Use fascia brackets within 150mm either side.
Gutter:
Clip the gutter into the outlet first. Insert the gutter to the gutter line marked in the outlet. Now clip it into the fascia brackets by tilting it to fit under the back clip then straightening it under the front clip. When you get to a corner hold a 90o angle (or 135o) in place and mark where the gutter needs to be cut.
Cut the gutter at the required place using a hack saw and clip into the angle. Use fascia brackets within 150mm either side to support the angle. Ensure no swarf affects the seals.
At the end of the gutter run fit an external stopend and clip in gutter as previously. If your guttering needs to connect to your neighbours at the end of a run connect it with a union bracket or if it is a different type of gutter use the appropriate adaptor.
Use gutter guard to prevent leaves and other debris from blocking your guttering.
Snow Loading:
Heavy snowfalls and rapidly melting snow can cause hazards to rainwater systems especially on smooth surfaces – such as conservatories – and steeply pitched roofs.
Additional support brackets with maximum centres of 600mm will help in some circumstances but rapidly thawing snow can slip very quickly and it is unlikely that a gutter system will be able to cope with the added load or impact. The system will be able to cope with the melt-water.
BS EN 12056-3:2000 states that in areas where snow lies on roofs the front edge of the gutter should not be higher than the projected line of the roof, unless snow guards or other precautions are used. Where fixing holes are provided on fittings these must be used during installation.
Good luck with your installation, should you have any enquiries about these steps, or to arrange a supply and fit service – feel free to give us a call on 01621842000 or WhatsApp a message on +447949280147 we would love to hear from you.