Mon – Fri: 7:00 am – 5:00 pm
Sat: 8:00 am – 12:00 pm
Good luck with your installation, should you have any enquiries about these steps, or to arrange a supply and fit service – feel free to give us a call on 01621842000 or WhatsApp a message on +447949280147 we would love to hear from you.
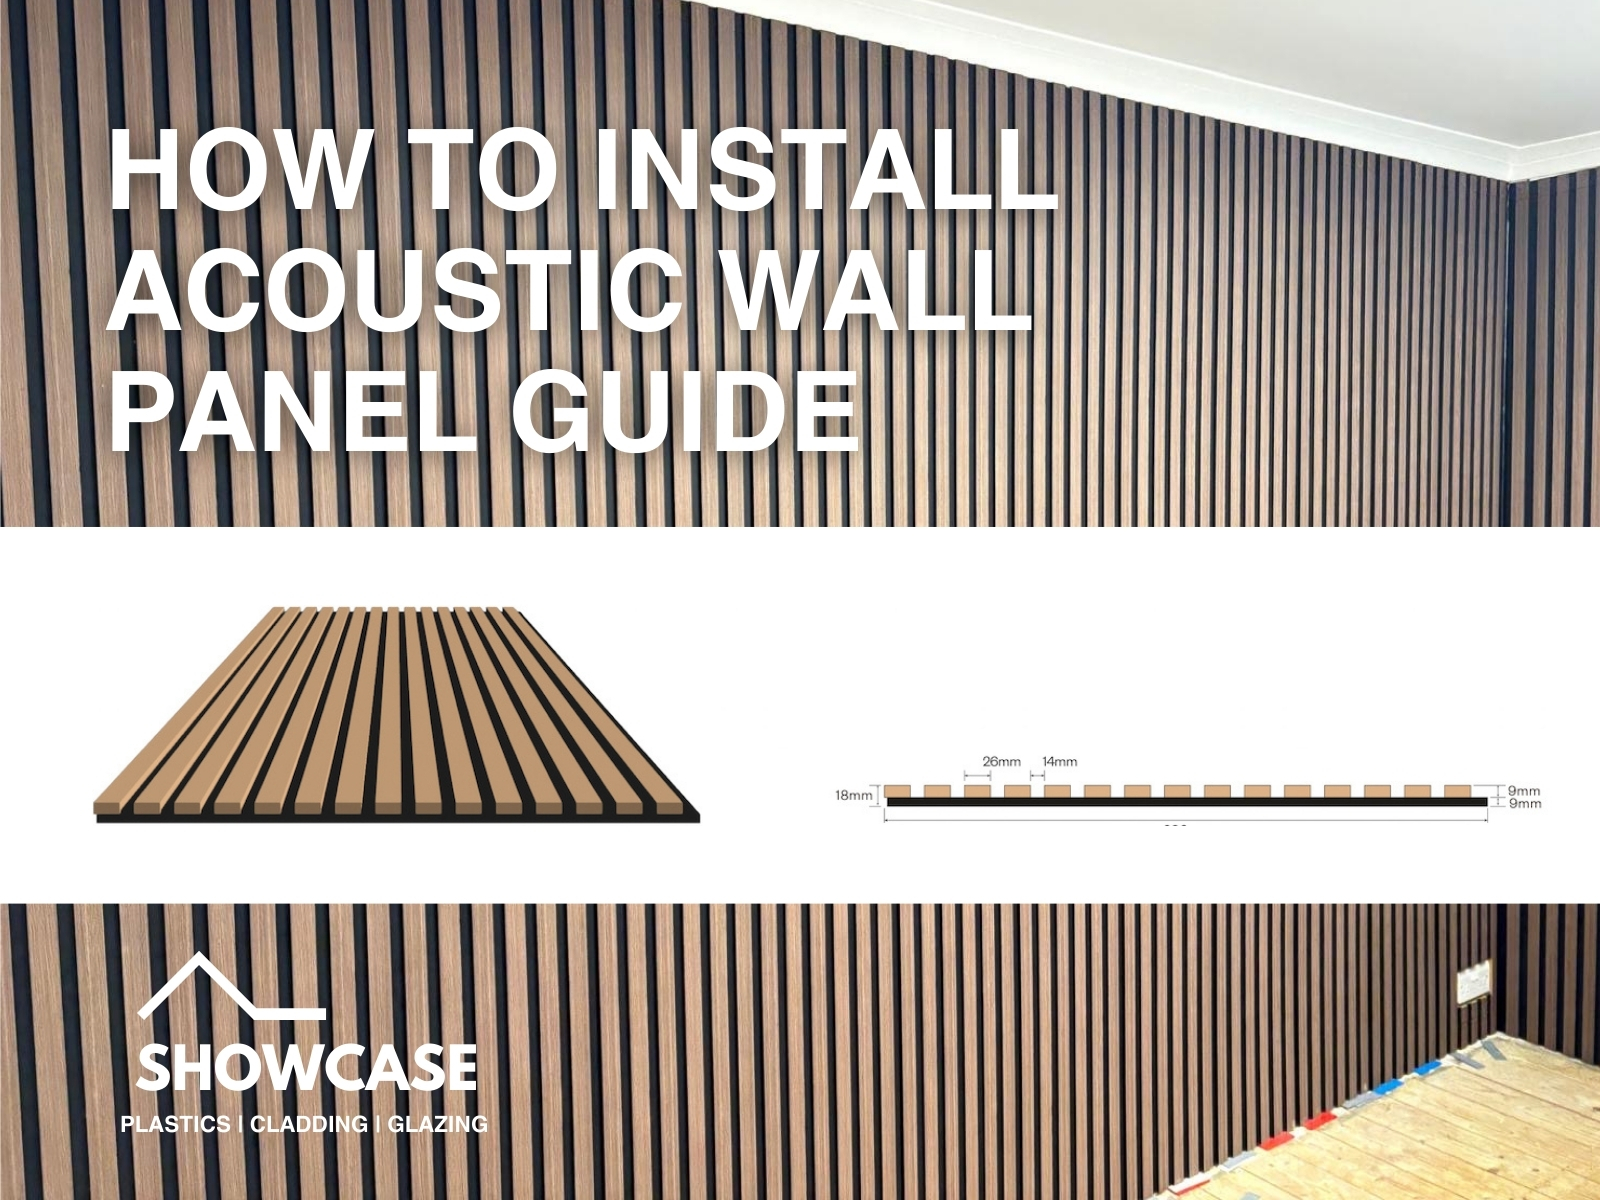
We recommend two methods for installing Zest Acoustic Wall Panels either using a grip and grab adhesive or securing the panels with screws directly into your wall.

Installing Zest Acoustic Wall Panels with Adhesive:
You will need: Stanley knife / Tape measure and pencil or marker / Adhesive and adhesive gun / Spirit level / Either a hand saw, circular saw or jigsaw all with a fine tooth blade.
1 – Prepare Your Wall:
Before attaching anything, clean your wall thoroughly to remove debris and old nails. Ensure the surface is completely flat and even for optimal results.
2 – Measure the Wall:
Measure the height and width of the area where you plan to install the wall panels. Mark the felt on the panel at these measurement points, as this is where you will cut. You will be installing the panels from left to right on the wall or from bottom to top (depending on your desired orientation).
3 – Cut Your Panels:
To cut the MDF slats, use a hand saw, circular saw or jigsaw. For a clean cut, place a strip of masking tape along your cut line. Use a Stanley knife to accurately cut the felt backing. Panels should be cut with the front face of the panel facing down (in other words the decorative side of the panel).
Measure the cut piece against the wall without adhesive to ensure a precise fit. Be sure to sand any rough edges using a 180 grit sandpaper.
Once you are confident the panel fits, apply the adhesive in a zig zag pattern on the back of the felt piece, ensuring even spacing along its length. We recommend a good quality grip and grab solvent free adhesive. Lift the panel into position (you may need assistance), keeping it straight, and press it against the wall.
Apply gentle pressure to ensure the adhesive adheres, holding it in place to allow the adhesive to set. After fixing the first panel to your wall, check the horizontal or vertical alignment with a spirit level to ensure it is straight. You are now ready to attach your next panel. Before pressing the panel onto the wall permanently you will need to make sure there is no gap between the panels and check their vertical or horizontal alignment again after each panel install.
Installing Zest Acoustic Wall Panels with Screws:
You will need: Either a hand saw, circular saw or jigsaw all with a fine tooth blade / Stanley knife / Tape measure and pencil or marker / Drill / 15 x black dry wall screws per panel 3.5mm x 35mm / (with suitable wall plugs) / Spirit level.
1 – Prepare Your Wall:
As with the adhesive installation, clean the wall thoroughly and ensure its flat and even before attaching any panels.
2 – Measure the Wall:
Measure the height and width of the area where you plan to install the wall panels. Mark the felt on the panel at these measurement points, as this is where you will cut. You will be installing the panels from left to right on the wall or from bottom to top (depending on your desired orientation).
3 – Cut Your Panels:
To cut the MDF slats, use a hand saw, circular saw or jigsaw. For a clean cut, place a strip of masking tape along your cut line. Use a Stanley knife to accurately cut the felt backing. Panels should be cut with the front face of the panel facing down (in other words the decorative side of the panel). Measure the cut piece against the wall without adhesive to ensure a precise fit. Be sure to sand any rough edges using a 180 grit sandpaper.
4 – Secure Your Panel to the Wall:
Position your panel against the wall and drill three screws every 60cm, starting about 20cm from the floor. Drill through the felt backing only, ensuring the screws penetrate the wall. After fixing the first panel to your wall, check the horizontal or vertical alignment with a spirit level to ensure it is straight. You are now ready to attach your next panel. Make sure there is no gap between the panels and check their vertical or horizontal alignment again after each panel install.
Note: Please ensure you use the correct raw or wall plugs for the wall you are screwing into, especially for walls made of old brick or less sturdy materials to provide a secure anchor for the screws.
Optional – Using Battens:
You can screw battens to the wall then screw the panels into the battens. We recommend securing the timber to the wall and then screwing the panels directly through the acoustic felt into the battens. To get the maximum sound absorption place Rockwool behind the panels between the battens. You will then achieve excellent sound absorption. This is also the ideal time to hideaway any media cables.
6 – Accounting for Obstacles – Sockets and light switches:
To accommodate plug socket and switches, measure the position on the panel and mark it on the back. Use a Stanley knife for the felt and a small hand saw for the wood slats. Sand down any exposed edges for a smooth finish. You may need to cut the panel into sections, but with proper measurement and installation, these cuts will be discreet.
For the proper installation of a plug socket or switch you will need the correct electrical box, all you need to do is install a spacer ring on an existing electrical box – this will allow for the cables to run the depth of the panel safely. The socket can then be screwed directly into the panels and wall to support the fixture.
Note: For Smaller Cut Pieces:
Our MDF slats are stapled to the felt backing at even intervals, which can risk detachment if the cut pieces are smaller. To mitigate this, ensure small pieces are cut where staples are centred on the slats. If that’s not possible, use a small amount of adhesive to secure the MDF slat to the felt backing.
7 – Installing onto Zest Acoustic Panels:
You can attach shelves, cabinets, TVs, and decorative items directly onto the panels. However, it’s important to wait 24 hours after installation before adding any items; this allows the adhesive used for the panelling to cure completely.
Ensure that your fastenings reach the substrate behind the panel, and make sure to pre-drill the holes. Drill directly into the slats. For heavier items, it’s essential to secure them by screwing through the panel and into the solid wall behind it, ensuring the weight is supported by the structural wall rather than the panel alone.
8 – Care and maintenance:
We recommend using a wood oil as it protects and keeps the natural look and feel of the wood. Once this is applied a light dusting is all that’s needed. Always use a dry cloth.
We hope you love your Zest Acoustic Wall Panels as much as we do. Don’t forget to tag us in your completed project photos on Instagram @showcaseplastics.
Good luck with your installation, should you have any enquiries about these steps, or to arrange a supply and fit service – feel free to give us a call on 01621842000 or WhatsApp a message on +447949280147 we would love to hear from you.